
![You are currently viewing Best Backpack For Rainier 2023[Latest & Durable]](https://backpacksidea.com/wp-content/uploads/2021/07/best-backpack-for-rainier.jpg)
If you are planning to visit Mount Rainier on your upcoming trip then the best time to visit this place is between July to August because at this time weather is warmest and driest among all the seasons. you can enjoy more your trip due to the well-dry and hot weather.
Although we can’t say exactly anything about the weather condition as it changes frequently.
No, your trip would be pleasant without proper gear, one most important gear is your backpack.
How to choose the right backpack for the Mount Rainier Trip?
Table of Contents
For such types of mountaineering trips, you need a backpack that comes with a nice suspension, has a good volume and has plenty of external tie-on points for ropes, bungee, Crampons, etc.
On Rainier Trip, you don’t need a summit pack, just keep a big pack that is not overstuffed, and try to keep it light.
If you are with someone on this trip and carry clothes, a sleeping bag, cooking tools, and tent gear then a backpack with a volume of 50 to 60L+ will be required (in most cases).
Choosing the right backpack for this trip also dependent on how long you are planning this trip.
Is it guided or unguided?
And if you are on a guided trip and will be going to use a hut for sleeping at Muir then a backpack with a capacity of 40 to 50L would be more than enough.
You can pack a sleeping bag, lightweight rain shell, pants, and a jacket in this light pack.
But the problem is there are many brands that introduce their mountaineer backpacks every year and choosing the best one that comes with all the necessary features and feels comfy even if fills out is a tricky task.
After researching more than 30 mountaineering backpacks in the past few months, We have listed the 7 Best Backpacks For Rainier that come with all the latest features, with good suspension, and give you the best values, what you pay for.
So without further ado let’s get started…
Comparison Table
| Mt Rainier Backpacks | Our Rating | Speciality | Weight | Volume | Material | Price |
|---|---|---|---|---|---|---|
|
Granite Gear Blaze |
Expert Choice |
One of the lightest backpacks in our test that can bear heavy load like charm. |
3 lbs |
60L |
100D robic nylon with DWR coating |
|
|
Osprey Aether |
Top Pick |
Decent fitting mechanism ,Good for carrying heavy load |
5 lbs |
65L |
420 HD nylon with DWR coating. |
|
|
Osprey Atmos 65 |
Top Pick |
Top-Notch Pockets, Ventilation & Comfort |
4.5 lbs |
65L |
Main body 100D nylon, bottom 420HD nylon. |
|
|
Deuter Aircontact Lite |
Budget Pick |
Torso height adjustment is better than others |
4.4 lbs |
65+10L |
Polyester +Nylon |
|
|
Gregory Baltoro 65L |
Top Pick |
Features pack backpack with ease of use |
4.8 lbs |
65L |
210D Honeycomb Criptorip & High Tenacity Nylon. |
|
|
Gregory Zulu 55L |
Top Pick |
Medium Load Backpack For Comfortable Trip |
3.7 lbs |
55L |
210D Honeycomb Criptorip & High Tenacity Nylon. |
|
|
Teton Sports 4000 |
Budget Pick |
Functional Backpack At Very Low Price |
4.5 lbs |
65L |
600D Diamond Ripstop/600D PU |
7 Best Backpacks For Rainier Review And Buying Guide
1. Granite Gear Blaze 60L For Mount Rainier
Best In Every Parameter
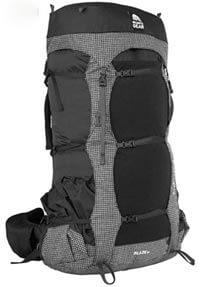
Its Features
- Volume: 60L
- Weight: 3 lbs
- Material: 100D robic nylon with DWR coating.
- Comes with hydration system.
Pros
- One of the lightest backpacks in our test that can bear heavy load like charm.
- Tons of thoughful pockets.
- Fully adjustable torso length.
- Multiple external straps to carry extra gears.
- Top accessibility.
Cons
- We find it difficult to deal with some tiny buckles with gloves.
What do you need in a backpack for the Mount Rainier Trip?
It should be lightweight, carry a heavy load comfortably, be easy to access, multiple pockets, decent ventilation, and nice external bungees.
All these features you will get in Granite Gear. The capacity of this backpack is 60L which is enough for a multi-day Mount Rainier trip to carry the neediest gear along with a nice lightweight backpack.
The weight of this backpack is only 3 lbs but carries a heavy load so you will not feel uncomfortable with that. This is helpful to explore the hidden beauty of your Rainier trip.
It has 3 compression straps on the front and also its both sides. The clipping buckles on them are used to lash items like tent poles, ice tools, etc.
Its top lid is removable and has one zipper pocket. The lid is useful to store toiletries and other small gear. You can remove it to reduce some extra weight if you don’t need it. It can also be used as a waist pack along with your waist belt.
The backpack has a decent pocket combination. The pockets are designed thoughtfully and placed in the right place which is hardly seen in any other backpack.
Overall a huge hip belt pocket, two easy-to-access side water bottle pockets, a front mesh pocket, and decent compression straps are some features that keep it on the Editor Choice list in this category.
2. Osprey Aether 65 Backpack For Rainier
Best For carrying Heavy Load And Better Fitting Mechanism
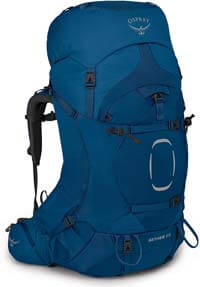
Its Features
- Volume: 65L
- Weight: 5 lbs
- Material: 420 HD nylon with DWR coating.
- Comes with a hydration system.
- Comes with sleeping bag compartment.
Pros
- Quick and easy to fit mechanism.
- Best for carrying heavy load comfortabily.
- Top and front accessibility.
- Slide lock torso length adjuster can be loosened and tightened according to your height.
Cons
- Heaviest backpack but manage heavy load comfortabily.
- The hip belt and water bottle pockets needs some improvement.
This feels very comfortable on the back and is the best choice for a multi-day trip or for winter camping.
If you are on an unguided Rainier Trip then The backpack from Osprey Aether is the best choice for you.
I found Granite Gear is far better than the Osprey Atmos 65L in terms of comfort, accessibility, pocket locations, and the capability to carry a heavy load effectively.
The backpack comes with an Anti-Gravity suspension on the back side which runs through the hip belt. This is really effective to eliminate heat and sweat from your back on hot days.
I am really impressed with its highly thick shoulder straps, and hip belt area, which provide a better comfort level when you have to walk on a long trail.
Let’s take a look at its rival Osprey Atmos 65 AG.
Why Is Osprey Aether 65 Better Than Osprey Atmos 65 AG?
Why we compare Aether 65 with Atmos 65 because they are available at almost the same price and you could confuse them.
- I found Aether provides more customization options and better support of the weight than Atmos.
- Due to the thick padding across its shoulder strap and hip belt, Aether feels more comfortable on your body than Atmos.
- You feel very comfortable, walking ascending, and descending on trails with 50 pounds of weight on my back with Ather. Atmos lose comfort level with more than 45 pounds of weight.
- With Aether, you have two ways to access its main compartment from the top and from the front side. Atmos only have accessibility from the top.
I’ve also tested Granite Gear, which is far better than both of these backpacks in terms of comfort level, weight-hauling capability, and functionality.
The only downside of Aether over Atmos is, it is a little bit heavier than it.
Overall the backpack is highly adjustable but feels a little bit heavy as compared to its competitors. I personally like its thick padded shoulder straps, nice hip belts, and better customization capability which is good for hiking on Rainier trails.
3. Osprey Atmos 65 Backpack For Rainier
Top-Notch Pockets, Ventilation & Comfort
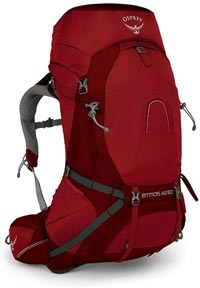
Its Features
- Volume: 65L
- Weight: 4.5 lbs
- Material: Main body 100D nylon, bottom 420HD nylon.
- Comes with a hydration system.
- Comes with a sleeping bag compartment.
Pros
- Anti-Gravity Suspension and decent ventilation.
- Top accessible.
- The size and placement of pockets are awesome.
- Fit on the fly adjustment system.
- Removable top lid.
- Huge hip belt pockets.
Cons
- Not good to carry load more then 40 pounds.
If you want to buy an Osprey backpack for Rainier Trip then Atmos comes with a decent pocket arrangement, proper ventilation, and a good comfort level.
Osprey Atmos comes with a decent suspension system, good adjustability, and other useful features which we are going to discuss further.
Osprey Atmos 65L is a good choice for a five days trip and I am really impressed with its trampoline back panel.
I found Aether and Atmos backpacks are almost identical in terms of their suspension and comfort level.
Its back panel is designed in such a way that effectively reduces hot spots, pressure, and friction between the bag and your back.
However, its shoulder straps are thick and soft on the shoulders but I feel them struggling to provide that much comfort when I pack over 40 pounds.
Its back panel has nice ventilation and is good enough for hiking in warm weather. I really impressed with its pocket arrangement and accessibility. Its dual access side water bottle pockets are really nice and you can put the water bottle vertically or angled forward.
Sometimes I feel pressure on my elbow and wrist when I try to take the vertically angled bottle out of the pocket.
The backpack comes with Fit To Fly adjustment and it helps to get the right fit in the chest, waist, and shoulder areas.
Overall its weight is 0.18 kg less than the Aether is not a good carrier if you have to carry more than 40 pounds of weight for a hiking trip.
4. Deuter Aircontact Lite 65+10L For Rainier Trip
Torso Height Adjustment Is Better Than Other
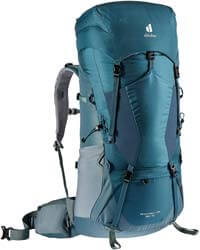
Its Features
- Volume: 65+10L
- Weight: 4.4 lbs
- Material: Polyester +Nylon
- Comes with a hydration system.
- Comes with a sleeping bag compartment.
Pros
- Deutor vario adjustment system for better vertical adjustibility.
- Highly durable and versatile backpack at low price range.
- Best budget backpack to carry up to 45 pounds.
- Comfortable and light weight backpack.
Cons
- Pockets are less as compare to above listed backpacks.
- Its padded shoulder straps feel warm and less comfortable to carry heavy load.
We keep this backpack in our budget category due to its amazing feature which is the Deuter Vario adjustment.
If you are planning your next adventure trip on Alpine like on a Rainier and want a backpack that comes with a nice and fully adjustable torso length then this backpack fulfills your wise with some cons.
The torso length can be adjusted vertically up to 10 inches which provides perfect fitting to most fatty and wide-shoulder people. We find its adjustability is better than other listed backpacks.
The shoulder straps and hip belts are well padded and feel very comfortable while carrying weight up to 45 to 50 pounds but after that, it feels uncomfortable.
The backpack feels warm on the body when carrying a weight of more than 45 pounds but just fine for bare skin.
In terms of comfortability, the above-listed backpacks are slightly better than this.
Pockets are fewer as compared to others. The backpack is top-accessible and comes with a small sleeping bag compartment.
Its mesh water bottle pockets are quite deep and the hip belt pocket is perfect to carry snacks, and a small camera but might not fit most of the smartphone.
Overall at the price range of under $200, this is a highly durable, solid, and versatile backpack on our list.
5. Gregory Baltoro 65L For The Mount Rainer Trip
Features rich backpack with ease of use
![Best Backpack For Rainier 2023[Latest & Durable]](https://backpacksidea.com/wp-content/uploads/2021/07/gregory-baltoro-65-for-rainier.jpg)
Its Features
- Volume: 65L
- Weight: 4.8 lbs
- Available in 3 sizes.
- Material: 210D Honeycomb Criptorip & High Tenacity Nylon.
- Comes with a detachable hydration system.
- Comes with a sleeping bag compartment.
- Rain cover is included.
Pros
- Accessible from top and from front U shaped zipper.
- Very comfortable and carried heavy load well.
- Easy to access dual zipper lid pockets.
- Fully adjustable torso length.
- Water resistance hip belt pockets.
Cons
- Little bit heavier than its rivals.
Gregory Baltoro and Osprey Atmos both backpacks come with the same capacity which is 65L and the price is also the same.
So Let’s find out…
What is the difference between Osprey Atmos and Gregory Baltoro?
- Both backpacks come with a decent suspension system and a greater comfort level.
- The Osprey Atmos feel lightweight as compared to Gregory Baltoro.
- The hip belt pocket is big in Osprey than Gregory but Gregory provides weather shield protection in its hip belt pockets while Osprey doesn’t.
- We find the arrangement of the pockets in Osprey is slightly better than the Gregory.
Osprey offers a removable top lid but Gregory provides a 2 zipper top lid that provides more space for your gear.
- In terms of Ease of use and accessibility, Gregory is a clear winner.
Osprey provides only top accessibility while Gregory has top and front accessibility. Its big U-shaped opening makes it easy to access each point of the main compartment.
- The Gregory comes with a rain cover while Osprey doesn’t.
- The most important feature of Gregory is its weight-hauling capability is better than Osprey Atmos.
The choice is yours, what you prefer most for your Rainier Trip.
Overall if you want better accessibility and want to tote load more than 40 pounds comfortably then you can go with Gregory.
6. Gregory Zulu 55L
Medium Load Backpack For Comfortable Trip
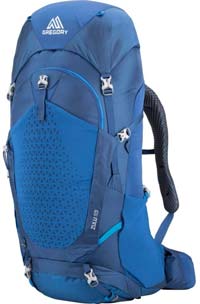
Its Features
- Volume: 55L
- Weight: 3.7 lbs
- Available in 2 sizes.
- Material: 210D Honeycomb Criptorip & High Tenacity Nylon.
- Comes with a detachable hydration system.
- Comes with a sleeping bag compartment.
- Rain cover is included.
Pros
- Economic backpack for Rainier Trip.
- Comes with decent suspension.
- Feature rich backpack with easy to access functionality.
- Main compartment can be accessed from the top, from front u shaped zipper and from the sleeping bag compartment.
- Water resistance hip belt pockets.
Cons
- Weight is large in terms of its volume.
Gregory Zulu comes with a good balance of features and weight. It is made of honeycomb rip-stop material and looks like a traditional rucksack.
This backpack is designed for hauling medium loads for a mid-range trip. I really like its thick padded shoulder straps and waist belt straps.
This is a medium-load backpack that can comfortably carry up to 40 pounds of weight. Its suspension is comfortable but I feel it is not as breathable as you find in some other models.
The good thing about this backpack is it provides three ways of accessibility to the gear, from the top, from the middle, and from the bottom.
It has mesh and stretchy side pockets which are good to carry water bottles. Its weight is 3.7 lbs and I feel its volume is less as compared to other similar-weight backpacks.
I have no complaints about its shoulder straps and hip belt because both are thickly padded and ergonomically designed.
Overall a nice backpack with a traditional look and design that is less expensive than the others. You can consider it if you want to experience a Rainier trip for the first time.
7. Teton Sports 4000 Budget Backpack For Rainier
Functional Backpack At Very Low Price
![Best Backpack For Rainier 2023[Latest & Durable]](https://backpacksidea.com/wp-content/uploads/2021/07/teton-sports-explorer-4000-budget-backpack-for-rainier.jpg)
Its Features
- Volume: 65L
- Weight: 4.5 lbs
- Material: 600D Diamond Ripstop/600D PU
- Comes with a hydration system.
- Comes with a sleeping bag compartment.
Pros
- Best backpack for newbie those have a very tight budget.
- Best for overnight trip with light weight.
- External straps are good to attach extra gears easily.
Cons
- Uncomfortable and pockets are not so easy to access.
- Bulky straps and buckets.
- Come with fewer features.
Teton sports 4000 is the best affordable option that comes with an internal frame. Teton two backpacks are very popular that come with an internal frame. The first one is 4000 and the second one is 3400 and many buyers get confused between them.
The Teton 4000 is 400 grams heavier than the 3400 and also you have to pay $10 more for it. The Teton 4000 weight is 2.3 grams.
Teton 4000 is a 65L pack whereas 3400 is a 55L pack, which means there is a significant difference in their volume.
Its (4000 series) hip belt doesn’t fit on your hip if it’s less than 28 inches and its torso length is between 16-20 inches. Keep in mind these parameters before purchasing it.
The bag feels comfortable with 20kg of weight and with a heavy load, it is not that comfortable due to its poorly designed suspension system.
The backpack is only accessible from the top and this would be a headache if you want to grab some items located at the bottom of the bag.
For the Rainier trip, you will definitely go with above listed best backpacks. Spending on a nice comfortable and feature-rich backpack is totally worth it because it will not only enhance your overall experience with all the needy gear that you want to carry but also be with you for years. Without losing their sturdiness and durability.
Detailed Buying Guide And FAQ
If you are planning your next adventure trip for climbing Mount Rainier then having all the necessary gear to deal with the tough weather conditions is a must.
And to organize all the needy things in one place you need a sturdy, comfortable, fully adjustable backpack that has a decent suspension mechanism.
Normally choosing the right backpack totally depend on
For how many days have you planned your trip?
What Size Pack Do I Need For Mount Rainier?
If your intention is to reach the top and back to the parking spot on the same day then you can definitely go as light as possible and in this case, a backpack with a capacity of 40L to 50L works great for you.
If you are on a guided trip then also you don’t need to overstuff your backpack as guides take care of such things.
If your trip is 3 to 4 days long then a 60L backpack with all the latest features (Granite Gear) makes the job done with ease.
If you are on an unguided trip and are planning for a 3 to 4-day climbing trip still this backpack performance is amazing.
If you want to explore the beauty of Mount Rainier fullest then you have to plan at least a week-long trip for that.
In this situation, you have to carry lots of gear like a stove, rain gear, jackets, tent gear, sleeping pads and bags, foodstuff, water, ice tools, etc.
What To Pack For Mount Rainier?
If you are on a guided trip then you don’t need to worry about anything.
The company provides you with a list of what to keep or what to not.
This packing list is prepared for unguided trips,
Climbing Gears List
- Rope
- Climbing Helmet
- LED Headlamp
- Sleeping bag & pad
- Climbing shoes
- Backpacking tent
- Ice Axe
- Carabiners
- Stove
- Food
- Lighter
- Map
Do I Need Crampons For Rainier?
Crampons are one of the most essential elements for mountaineering like Rainier.
There are two types of Crampons available in the market:
- Aluminum Based Crampon
- Stainless Steel Based Crampon
An Aluminum-based crampon is just half the weight of a steel-based crampon.
Aluminum-based crampon is considered by those climbers, who want to save each gram from their pack.
Those who want to climb as lightly as possible use Aluminium Crampons but the main downside of such crampons is they can easily bend and break and I will not suggest using them for climbing.
Not good for any route on Mount Rainier.
On the other hand, a steel Crampon is a very strong and trustable piece of equipment for your safety on the mountain. I usually prefer steel although its weight is high that is the thing that must be sacrificed for safety purposes.
How Dangerous is Climbing Mt Rainier?
If I tell you that there is no risk in climbing Mt Rainier then this is totally the wrong information.
Every mountaineering trip is full of dangerous spots, it depends on you and your training, and how well you can tackle the dangerous situation.
If you have proper training and have all the safety gear then the chances of a happening unintentional incidents are less but still, there is a risk.
Every year more than 100 people dead on a mountaineering trip due to Avalanches, rockfalls, and steep snow slope is also a big cause for such indicated.
Conclusion
If you are planning for an Adventurous Mount Rainier journey on your upcoming trip then this article really helps you to choose the right backpack that can enhance the overall experience of Your Mountaineering trip.
I would recommend you choose the Granite Gear 60L, which is a perfect mountaineering backpack right now.
This is one of those backpacks that haul heavyweight almost unnoticed by most of climbers.
Otherwise, you can choose Osprey Aether Or Atmos. Aether is good in customization, comfort & support, and accessibility while Atmos is lightweight and its fitting mechanism is better than Atmos.
If you are on a tight budget then go with Teton Sports 4000.
![Read more about the article Best Backpack For Canyoneering 2023:[Latest Top Pick]](https://backpacksidea.com/wp-content/uploads/2022/02/best-backpack-for-canyoneering.webp)
![Read more about the article Best Backpack For Backcountry Skiing 2023[Latest Top Pick]](https://backpacksidea.com/wp-content/uploads/2021/03/best-backpack-for-backcountry-skiing.webp)
![Read more about the article Best Backpack For Rockhounding 2025[Latest & Durable]](https://backpacksidea.com/wp-content/uploads/2021/08/best-backpack-for-rockhounding.webp)